· 7 min read Posted by Gustavo Fão Valvassori
Jetpack Compose for iOS: Interoping with native Components

One of the “Killer Features” from Kotlin Multiplatform is its interoperability. It helps you play with the native platform transparently. In Jetpack Compose we have the same principle. The reason to have it was simple: Migration. You can open a lot of doors for the devs if you provide a way to co-exist with legacy code.
With the efforts of the JetBrains team, we are seeing the same thing happen with Compose Multiplatform. All supported platforms have support for interop with the Native ViewSystem, and on iOS you can interop both with SwiftUI and UIKit. In other words, you can use Compose inside your Swift/UIKit and SwiftUI/UIKit inside Compose (similar to what we have on Android).
But how can I do so?
Using Compose elements on iOS
This is the most common case, and if you already created a Compose Multiplatform project with iOS, you probably already used it. But let’s see how to implement it.
To access composable elements on Swift, we need to explicitly “export” them. For that, we wrap them into a UIViewController. Compose iOS provides a proper method to create a UIViewController where you can assemble your composables.
// Use the `ComposeUIViewController` function
fun AppViewController() = ComposeUIViewController {
    // This is a composable context, so we can call our composable functions
    App()
}

@Composable
fun App() {
    Text("Hello iOS!")
}As compose exports a UIKit ViewController, if we want to use it in SwiftUI we must convert it to a
UIViewControllerRepresentable.
// Create the View
struct ComposeView: UIViewControllerRepresentable {
    func makeUIViewController(context: Context) -> UIViewController {
        AppViewController() // Call the Kotlin ViewController
    }

    func updateUIViewController(_ uiViewController: UIViewController, context: Context) {}
}

// Use it
@main
struct iOSApp: App {
	var body: some Scene {
		WindowGroup {
			ComposeView() // Instantiate compose as a SwiftUI Component
        }
	}
}
And that’s it. You have your Compose function rendering inside SwiftUI. 🎉🎉🎉
.frame() SwiftUI
modifier.Using iOS Views on Compose
Making a SwiftUI view available within a Composable element follows a similar idea. We just have to “wrap” it into a
ViewController, and use the UIKitViewController Composable to render that element.
Here is a small example using the SwiftUI MapView. It requires only four simple steps to implement the UI Interop:
1. Create your view instance;
Here is just SwiftUI implementation for simple Map view.
import SwiftUI
import MapKit

struct MyMapView : View {
    @State private var region = MKCoordinateRegion(
        center: CLLocationCoordinate2D(latitude: 51.507222, longitude: -0.1275),
        span: MKCoordinateSpan(latitudeDelta: 0.5, longitudeDelta: 0.5)
    )

    var body: some View {
        Map(coordinateRegion: $region)
            .frame(width: 300, height: 300)
    }
}
2. Wrap the SwiftUI View into a ViewController;
Then, you need to wrap the View in a ViewController. For that, official SwiftUI documentations recommend using the
UIHostingController. It has a similar purpose to the ComposeUIViewController, but now we will wrap a SwiftUI into
a ViewController.
func myMapViewFactory() -> UIViewController {
    let myMapView = MyMapView() // Instantiate the SwiftUI View
    return UIHostingController(rootView: myMapView) // Use the view to construct a ViewController
}
3. Create your composable with a ‘factory’ parameter
This factory must return an instance of ‘UIViewController’. It will be used in the UIKitViewController composable that
renders the SwiftUI element, and use the UIHostingController previously declared.
fun MapViewController(
// Factory parameter that will instantiate SwiftUI
mapFactory: () -> UIViewController
) = ComposeUIViewController {
Column(
modifier = Modifier.fillMaxSize(),
horizontalAlignment = Alignment.CenterHorizontally,
) {
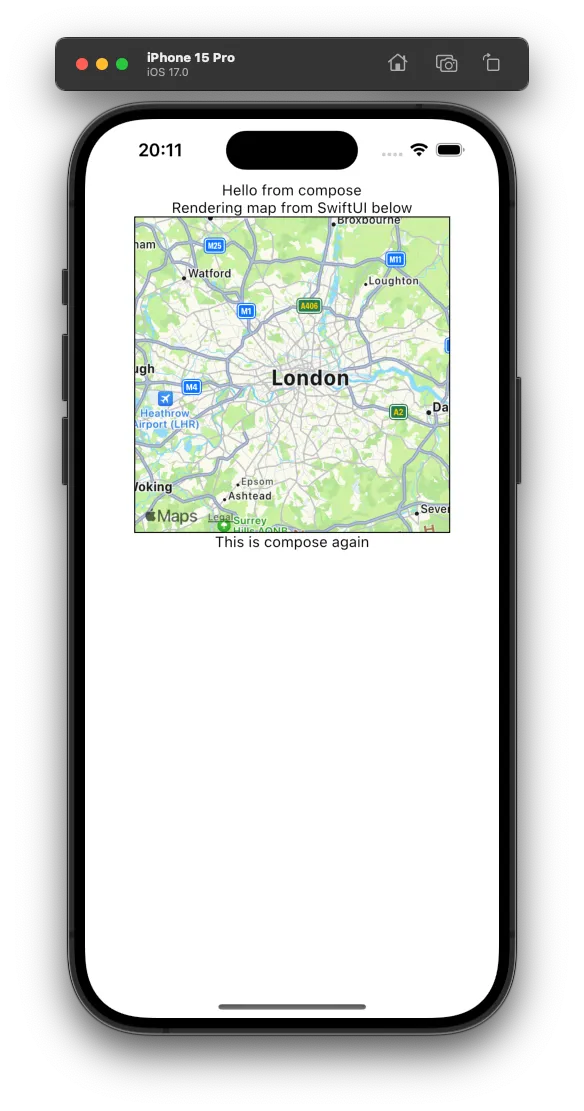
Text("Hello from compose")
Text("Rendering map from SwiftUI below")
// Rendering the SwiftUI View
UIKitViewController(
modifier = Modifier.size(300.dp).border(1.dp, Color.Black),
factory = mapFactory,
update = {}
)
Text("This is compose again")
}
}4. Update the Compose View from SwiftUI
Lastly, we can update the call to our Composable ViewController, adding the factory as argument:
struct ComposeView: UIViewControllerRepresentable {
    func makeUIViewController(context: Context) -> UIViewController {
        MapViewController(mapFactory: myMapViewFactory)
    }

    func updateUIViewController(_ uiViewController: UIViewController, context: Context) {}
}
After these steps, you will have something similar to this:
Sharing Data
Sharing data between Swift/Kotlin is also possible, but it can be a bit tricky. A simple solution would be passing an object to the “other side” when creating it (like a ViewModel) and use it to manage the view state. With that, you can change your SwiftUI view from Compose (or vice-versa).
Using the Map example, we could create a ViewModel that fetches some random Coordinates and move the camera. The ViewModel would be something similar to this:
class MapViewModel : ViewModel {
    private val _currentCoordinates = MutableStateFlow(KMPCoordinates(0, 0))
    val currentCoordinates = _currentCoordinates.asStateFlow()

    fun randomCoordinate() {
        viewModelScope.launch {
            _currentCoordinates.value = TODO("Fetch a new random coordinate")
        }
    }
}
Then we can pass the ViewModel instance to the SwiftUI:
fun MapViewController(
    mapFactory: (viewModel: MapViewModel) -> UIViewController
) = ComposeUIViewController {
    val viewModel: MapViewModel = // resolve the ViewModel
    UIKitViewController(
        modifier = Modifier,
        factory = { mapFactory(viewModel) }, // Pass the ViewModel on instantiation
        update = {}
    )
}
Create the MapView and pass the instance:
struct ComposeView: UIViewControllerRepresentable {
    func makeUIViewController(context: Context) -> UIViewController {
        MapViewController(mapFactory: myMapViewFactory)
    }

    func updateUIViewController(_ uiViewController: UIViewController, context: Context) {}

    private func myMapViewFactory(viewModel: MapViewModel) -> UIViewController {
        let myMapView = MyMapView(viewModel: viewModel) // Instantiate the SwiftUI View
        return UIHostingController(rootView: myMapView) // Use the view to construct a ViewController
    }
}
And finally use it in my SwiftUI view:
struct MyMapView : View {
    var viewModel: MapViewModel
    @State private var region = MKCoordinateRegion(
        center: CLLocationCoordinate2D(latitude: 51.507222, longitude: -0.1275),
        span: MKCoordinateSpan(latitudeDelta: 0.5, longitudeDelta: 0.5)
    )

    var body: some View {
        VStack {
            Button(
                action: { viewModel.randomCoordinate() }, // Call some ViewModel method
                label: { Text("Get new coordinates") }
            )
            Map(coordinateRegion: $region)
                .frame(width: 300, height: 300)
                .task {
                    // Observe ViewModel state (Using SKIE)
                    for await coordinates in viewModel.currentCoordinates {
                        region = MKCoordinateRegion(
                            center: CLLocationCoordinate2D(latitude: coordinates.lat, longitude: coordinates.lng),
                            span: MKCoordinateSpan(latitudeDelta: 0.5, longitudeDelta: 0.5)
                        )
                    }
                }
        }
    }
}
Even though it works, there’s a lot of “boilerplate” code to achieve something simple. Could it be simplified? That’s a loaded question and the short answer is: it depends. Stay tuned for the next posts on this subject.
Final thoughts
Compose and SwiftUI integrate with each other spectacularly. This allows you to use views and composables in both directions (Compose on SwiftUI and SwiftUI on Compose). For simple cases, it works like a charm, but when you require to share data things can get ugly fast.
There are many variables that can change how you share data. It will depend on your requirements, project dependencies, and many other factors. There are no Silver Bullet for it. In this article we presented a simple case, and even in this limited scope things started to get tricky.
TL;DR; the means are there, and they are quite flexible. Kotlin and Compose Multiplatform make a great job to allow interop, you just need to find the right path for your project.