· 6 min read Posted by Gustavo Fão Valvassori
Getting Started with Web Assembly and Kotlin Multiplatform

Since almost the beginning of the web, JavaScript has been the only language that could run in the browser. If you
wanted to create a web application with dynamic behavior, sooner or later, you would have to write some JavaScript code.
But, in 2015, a new technology was announced to change this scenario: Web Assembly (Wasm). Web Assembly is a binary instruction format that allows you to run code written in languages other than JavaScript in the browser. This means you can write code in languages like C, C++, Rust, and Kotlin, and run it in the browser.
The support for Web Assembly in Kotlin was announced by JetBrains in April 2023 in the 1.8.20 release. Since then, the Kotlin team has been working to improve its support. With the latest release, you are now able to build full interactive web applications using Compose Multiplatform.
Even though the support for Web Assembly in Kotlin is still experimental, it’s an excellent alternative to JavaScript for writing web applications. This article will teach us how to use Kotlin to write Web Assembly code.
Creating the project
Just like the Getting Started with Compose for Web project, we will create a new clean project using IntelliJ IDEA and manually add the dependencies. But if you want to start a project with Compose Multiplatform configuration ready, you can also use the KMP project wizard.
For now, the clean project will be enough. So, let’s create it using the IntelliJ IDEA.
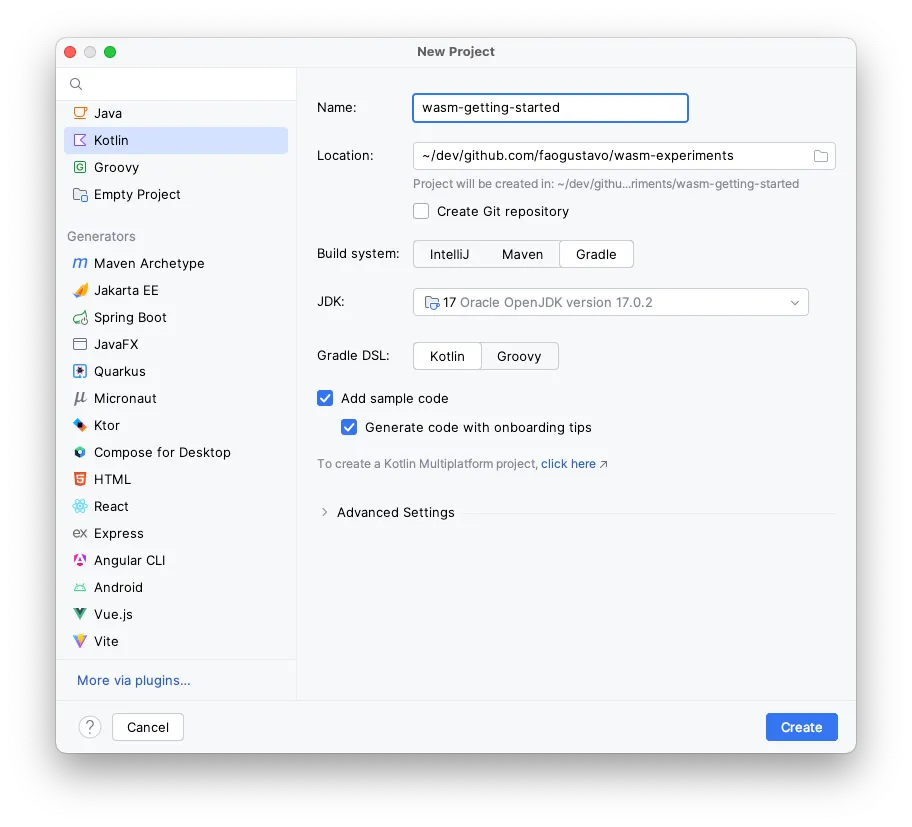
For now, let’s keep the “Add sample code” checked to have some sample code. As you can see below, it’s a simple
Hello World.
fun main() {
    val name = "Kotlin"
    println("Hello, $name!")

    for (i in 1..5) {
        println("i = $i")
    }
}
Now, let’s start configuring it to compile for Web Assembly. First, you need to change the Kotlin Plugin to use the
“multiplatform”, and add the wasm target to the project. You can do this by editing the build.gradle.kts file and
adding the following lines:
plugins {
    // Change from kotlin("jvm") to kotlin("multiplatform")
    kotlin("multiplatform") version "1.9.22"
}

// Add the Kotlin configuration with wasm target
kotlin {
    @OptIn(ExperimentalWasmDsl::class)
    wasmJs {
        binaries.executable()
        browser()
    }
}
Next, create your source directory for the wasm target and move the sample code to the new directory. You can do this by following the steps in the video below:
The final step is to create an HTML file to load the wasm project and show in the browser. You can create a simple file,
like the one below, in the src/wasmMain/resources directory:
<html>
    <head>
        <title>Hello World Wasm</title>
        <script src="wasm-getting-started.js"></script>
    </head>
</html>
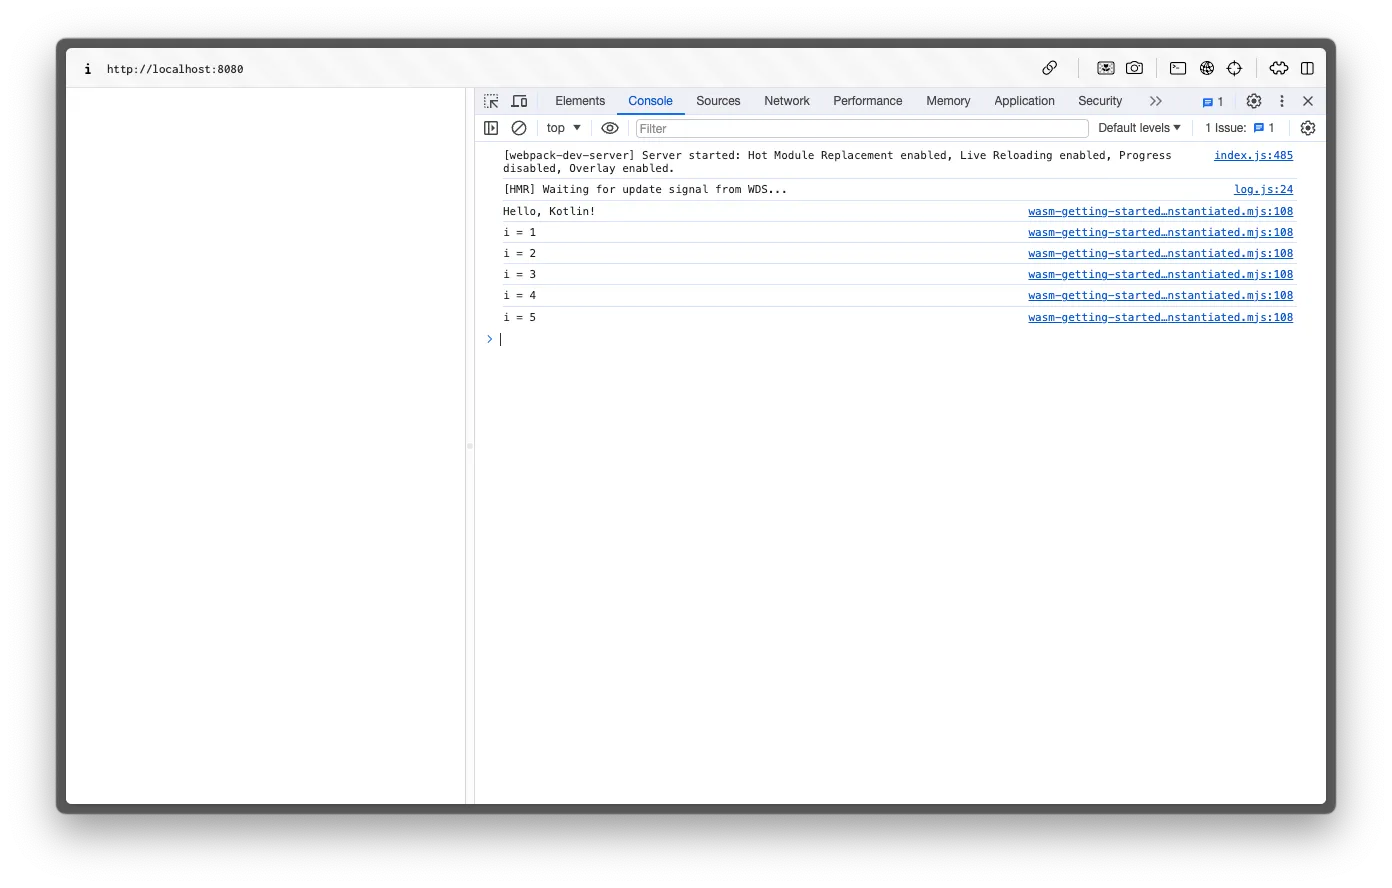
Now, you can run the wasmBrowserDevelopmentRun task to compile the project and open the HTML file in the browser. If
you prefer, you can use the --continuous flag to keep the browser open and automatically reload the page when you
change the code.
./gradlew wasmBrowserDevelopmentRun --continuous
🎉 With this, you have your first Kotlin Web Assembly project running in the browser!
To build the final/production output, you can use the wasmJsBrowserProductionWebpack task. It will generate the final
output in the build/dist/wasmJs/productionExecutable directory. You can use the files in this directory to deploy to
any static web server (like Github Pages, Netlify, Vercel, or any other you prefer).
How does it work?
The process of instantiating a Web Assembly module in the browser is a bit more complex than just running a JavaScript
file. First, you need to load your .wasm file and then instantiate it using the WebAssembly.instantiateStreaming
function.
The instantiate has two arguments:
- The Wasm file stream (you can use the
fetchfunction to get it); - An import object that provides the functions and objects that the Wasm module needs to run.
Here is an example of how you can do this:
// Example from MDN Docs
// Source: https://developer.mozilla.org/en-US/docs/WebAssembly/Using_the_JavaScript_API
WebAssembly.instantiateStreaming(fetch("simple.wasm"), importObject).then(
  (obj) => obj.instance.exports.exported_func(),
);
But doing this manually is a bit complex, as you need to provide all the required imports for the KotlinWasm module to run.
A simple project can have over 3.500 different imports that you need to provide. To help with this, the Kotlin compiler
generates a JavaScript file that provides all the required imports and instantiate the .wasm file.
Here is a short version of the glue code generated by the Kotlin compiler:
export async function instantiate(imports={}, runInitializer=true) {
    const wasmFilePath = './wasm-getting-started-wasm-js.wasm';

    let wasmInstance;
    let wasmExports;

    // Declare all bridge methods
    const js_code = {
        // These are just a few of them as example
        // You can check the full list in the generated code from your project
        'kotlin.captureStackTrace' : () => new Error().stack,
        'kotlin.wasm.internal.stringLength' : (x) => x.length,
        'org.w3c.dom.window_$external_prop_getter' : (_this) => _this.window,
        'kotlin.js.Promise_$external_fun' : (p0) => new Promise(p0),
    }

    const importObject = {
        js_code,
    };

    try {
        if (isNodeJs) {
            // Run methods for NodeJS
        }

        if (isStandaloneJsVM) {
            // Run methods for standalone JS VM
        }

        if (isBrowser) {
            // Load Wasm file with all imports defined previously
            wasmInstance = (await WebAssembly.instantiateStreaming(fetch(wasmFilePath), importObject)).instance;
        }
    } catch (e) {
      // Error handling for the Wasm instantiation
    }

    wasmExports = wasmInstance.exports;

    // Run the `main` function
    if(runInitializer) {
        wasmExports._initialize();
    }

    // Return the instance and exports
    return { instance: wasmInstance,  exports: wasmExports };
}
Final thoughts
In this article, we learned how to create a new Kotlin project that compiles to Web Assembly and runs in the browser. This is the entry point and the basics you need to know to start writing web applications using Kotlin and Web Assembly.
We also learned a bit about how the Kotlin compiler generates the glue code to instantiate the Wasm module and how it provides all the required imports for the Wasm module to run.
In future articles, we will explore more about this Kotlin target and how to use it to create an entire web applications. Stay tuned for more!